
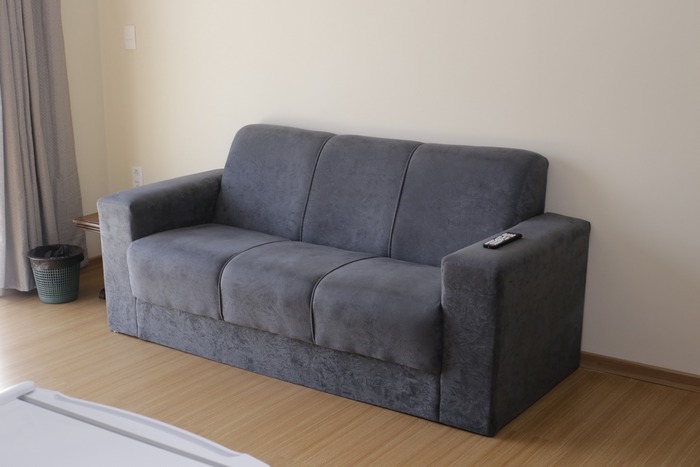
Are you confused on how you can create a simple sofa design using the Rhino 3D platform? Playing around with shapes in Rhino can waste a lot of time without a clear plan. The time you could be spending on other things like furthering your design as a busy architect.
This article guides you through how to create a model of a sofa in Rhino without the need to spend hours modeling your furniture so you can get a sofa design into your model nice and quickly. Architecture Genie have become specialists in creating simple tutorials that you can follow in order to simplify the design process.
This is because our articles are written by students and young professionals who have been in your shoes, struggling to get your Rhino software to work with you. Now we have mastered the basics, we want to cut out the time wasting and help you too.
And read on for further advice on the different types of sofas there are and how you can best fit them into the building you’re designing as an architect.
contents
How to create a model of a sofa in Rhino 3D step by step
Below are the instructions you can take step-by-step in order to make sure you design the right sofa for your model. Be sure to pay attention to everything carefully as you don’t want to miss anything out and end up with an unfinished model. The whole process should take you no longer than 15 minutes, let’s get started!
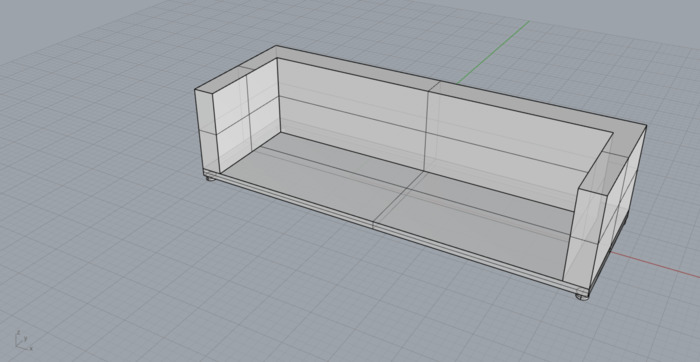
Step 1: Create the base of the sofa
To begin, create the base of the sofa by drawing a rectangle that is able to be extruded. You can do this using the “extrude” command or using the gumball feature in Rhino. When using gumball, click or drag on the ball icon of the blue arrow that points upwards.
Your shape should end up looking like something below if you have done this correctly. Note, if you’re looking to make the sofa you’re designing to scale, you should begin forming the dimensions for the rectangle by inputting lengths into the command line.

Step 2: Create the legs of the sofa
In the next step, you should make the legs of the sofa by adding in cylinders to the base. Make sure the legs are to scale and aren’t too high in comparison to the size of the sofa.
Also, make use of the “move” command as well aligning all of the legs using the “mirror” command if that is what you want to do. It is also possible to angle the legs outwards as an optional step if you want to make the sofa more unique.
In this example, I have raised the height of the sofa so the grid canvas meets the legs rather than the base of the sofa too.

Step 3: Create the form of the sofa
In order to create the armrests and the back of the design, you need to create two solid shapes that intersect each other and then use the “split” command to create a void where the people in the sofa will sit.
Before you “split” anything, make sure the object that is going to split the bigger cuboid is completely intersecting the larger one and that it is centered to the sofa. An easy way to do this is to adjust the shape by a small amount downwards and then use the “Move” command and snapping to the Osnap “Mid” snap to make sure both cubes are aligned with the center of the base.
Afterwards, the split should work correctly and you can fill in the gaps by using the “rectangle” command to fill in the gaps on the inside of the sofa. Then, click on each rectangle and use the “PlanarSrf” command to fill in the gaps with a surface.
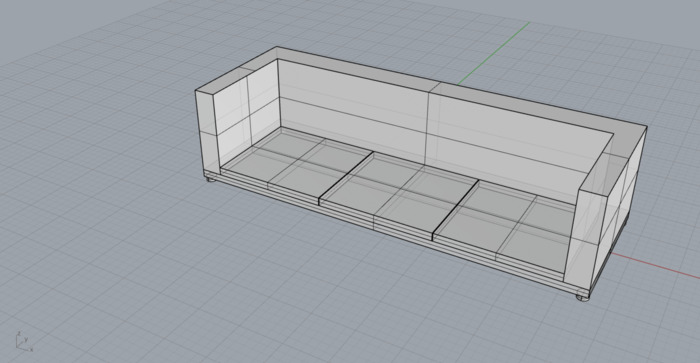
Step 3: Create the cushions for the sofa
The first thing you should do to make sure each cushion of the sofa is the same length is to measure the length of the sofa. So, use the “polyline” command to measure the length in between each arm and then select the line and do the “length” command to find out the length.
For the sake of this tutorial, we will divide the lengths of the cushion into three but if you want four cushions on your sofa, then it is also possible to have more. This is where you can customize the sofa to meet the needs of the building in question.
Once you have this length, divide it by three and make each of the lengths of the cushion this divided length. This can be done by using the “Box” command and inputting the value of the length it should be in the command line.
Make sure all of the cushions are evenly spaced out by aligning the right cushion to the right side of the chair, the left cushion to the left side of the chair and the middle cushion to the middle of the chair by using the Osnap features and making sure you have the right points selected.
You can easily move the the cushions around by selecting them and using the “Move” command.
Step 5: Chamfer the edges of the cushions
The final step of the process is to make the cushions appear more like cushions. This can be done by chamfering the edges of each cushion. Use the command “ChamferSrf” and select all the tops of the cushions and all of the sides of the cushions too.
Next, press “Enter” on your keyboard which will bring you to the next step of the process where you’ll be able to input to what extent you want the chamfer to cushion. Do this by zooming in, selecting the balls of the chamfer and then inputting a number.
You will then need to delete the edges of the cushions and re-draw them by using the “Polyline” tool to go over the new edges that have been deleted. Then again use the “PlanarSrf” to fill in these shapes with a rectangle.
In the process, you will get rid of the overhanging surfaces that occurred after you used the “ChamferSrf” command.
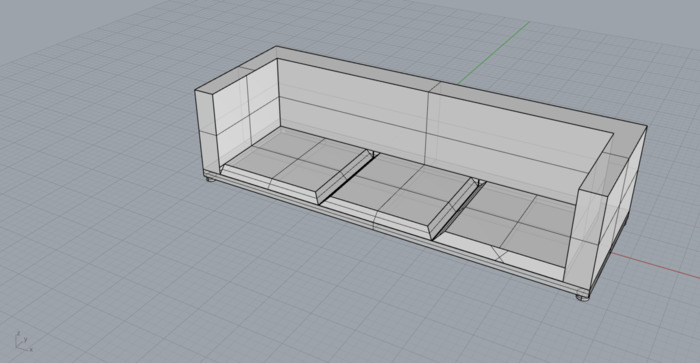
And that is it, and all you need to create a simple sofa in Rhino. Of course, you can get more detailed and try to round the surfaces of the sofa too but this is up to you and how detailed you want the sofa to be.
What different types of sofas can you create?
Aside from the sofa that has been created in the previous steps, there are also other types of sofas that can be created, depending on what kind of style you were going for in the building you are modeling.
From the Tuxedo sofa to the sectional sofa, take a look below to see which type is best suited to your design. Using this inspiration, you could use the above steps combined with these sofas to create a unique design.
Tuxedo style sofa
A tuxedo style sofa is known for having distinct armrests that are the same height as the backrest. This creates a clean and sleek look, perfect for adding into a room with a simpler design where you don’t want the sofa being the center of attention of the room.
This style of sofa is often thought to resemble formal fashion, hence the name “tuxedo” and can therefore also be found in places that are upper class and meant to resemble a sense of luxury such as hotel lobbies and cigar lounges.
The Tuxedo style sofa is often considered a modern style of sofa which can be made of various materials like leather, velvet, and even wood if the furniture is meant to be placed outdoors. You can add or reduce the dimensions of the sofa to model your sofa in Rhino 3D to resemble more of this look.
Chesterfield sofa
If you’re looking for deep, buttoned upholstery with larger and rolled arms, the Chesterfield sofa could be the right sofa to add into your Rhino model. The design of this style of sofa is believed to have originated in the 18th century and was named after the Earl of Chesterfield, who commissioned the first piece.
This sofa is often made of leather due to the way the buttons are placed and features tufted buttons on the backrest and arms. The backrest also is usually lowered which isn’t always the most comfortable but it is there to represent the classic, elegant and timeless look. If you model a chesterfield sofa in Rhino, you should be able to use it in a variety of interior design styles.
From luxury and high-end interiors, to an addition to a living room or living space, the sofa will certainly add character and an older look to a space. You can also model Chesterfield chairs that are part of your design to add to the look.
Sectional sofa
In architecture, you may create a plan, elevation or section as an architectural drawing in Rhino. Unfortunately, a sectional sofa has little to do with architectural drawing and more to do with the fact that the sofa is made up of multiple sections, or pieces, that can be rearranged or configured to fit the layout of a room.
These sections can include a variety of pieces, which may be able to be customized. Nonetheless, most of the time the sections come already attached to the sofa. Sectional sofas are therefore often larger in size and able to be added and removed a lot more easily. Making them a popular choice amongst modern households.
That being said, because of their larger design, it would be rare to find a sectional sofa in a hotel lobby or somewhere like a hotel room. So consider this depending on the type of building you’re modeling in Rhino 3D.
So, if you like the look and feel of a sectional sofa, decide whether to model it in an L-shape, U-shape, and even circular shape and then decide on the materials and style. Also, be sure the color choice of the sofa doesn’t interfere with other design aspects of the room like the curtains or the carpets in the space so everything works together well.
How many sofas should go in a room when modeling?
The amount of sofas that should go in the building when designing an interior space is dependent on the use of the room. You may think that sofas are only able to be applied to living rooms but there are a range of other rooms such as hotel lobbies, bedrooms and potentially outdoor areas that could all benefit from a sofa.
First, consider what the use of the building is and how many people will be using the space. This can be a great way to begin deciding on sofa space. How many people will use the room at max capacity? You may want to create the same amount of seating for this number of slightly less.
Where to position sofas to save space when modeling?
When positioning a sofa in a small space in Rhino, there are a few strategies you can use to save space and make sure the room of the building is used to the best of its ability.
Against a wall
Placing the sofa against a wall will take up less floor space and can create the illusion of a larger room. This also works well because the sofa can then gain access to things like plug sockets and be away from where most people walk.
In a corner
Positioning a sofa in a corner can help to save space and create a cozy and intimate seating area. Especially if the room is small to begin with, this can be a good idea when modeling in Rhino as it is hard to efficiently fill in corner space otherwise.
Floating in a room
If you have an open-plan space, a sofa in the middle of the room instead of a table can help to define different zones and can also be used as a room divider. It is useful to note that this only works well if the room is larger and there is the right amount of space on either side of the sofa.
Use a loveseat or smaller sofa
Instead of a full-size sofa, consider using a loveseat or a smaller sofa which will take up less space. This is a great idea for a space that needs some seating but struggles for room. Model a smaller sofa like this into your room in Rhino and watch the room appear larger than it is.