
Chairs are hard to model as furniture in Rhino because of the angles you have to create the surfaces with. Modeling a chair that looks good and also is able to blend in to the rest of the architecture you have modeled in Rhino is essential to create the right atmosphere in the buildings you design.
If you get this wrong, you could spend hours on a simple chair and not have the time to model the broader architecture of the model which is where you want most of the attention of your model to go.
So, read on for our article that will guide you through how to create a chair without actually spending all day behind your computer which means you can get on with the important parts of your Rhino model and prove to your tutors and managers your project makes sense.
contents
Download the chair created in this tutorial
For more downloads just like this, sign up to our email list where we email out super convenient resources to save you time just like this one.
How to create a chair model in Rhino 3D step by step
In the below steps, we will create a chair in Rhino that can be used to slot underneath a table and seat people within an indoor environment.
There are a lot of tutorials online but very little that are able to break down how to create a chair in an easy to follow format without using too many complicated prompts and commands.
Create a series of lines
In the right view, type the command “line” which will turn on the line drawing tool in Rhino and allow you to begin drawing.
Starting from the origin or somewhere nearby, click and hold shift which will draw you a line that goes towards the left, then draw another line continuing on from this that is angled upwards like in the below image but not completely straight. Try to create a slightly obtuse angle as you go.

Before you move on from this step, press “Ctrl + A” which will select both of the lines that you have made and then press “Ctrl + J” which will join both of the lines so when you select them in the next step, they will appear as one line.
Create corners for the seat
To create the corners of the seat, you will need to select the lines you have created and then run the command “Fillet”. To toggle how large you want the curve to be, you would have to change the settings in the command bar.
Click on the “Radius” setting in the command bar and then input the number three or wherever number you want. Bear in mind that this curve represents the vertice between the back and the seat of the chair so it cannot be too large.

Once you have inputted these settings, click on the edges you have made in the previous step and press “enter” and the cure should appear as below.

Complete the seat and back of the chair
To turn the seat into a surface rather than just a line, you would need to use the “Offset” command. This command will prompt you to select the line you have created and filleted in the previous steps and then you may need to change the InCplane setting to yes to offset the chair in the right direction in Rhino as seen below.

After you have done this, make sure you turn the Cap settings to “none”. Simply click on the word cap and then it will prompt you on some options to pick.

Next, change the distance settings too to an appropriate length so that when you position your mouse over the design, there is a sufficient amount of space on either side of the chair so it looks practical. In this case, we have chosen 6. Also, ensure the BothSides setting is on too so there is an offset on both sides of the line

Once you have done this, the chair should look more like a chair as the line has now moved to a surface.

Increase the length of the centre curve
By heading into the “Right” view, you will be able to select the middle line, hold down Shift and then move the end of the line upwards or to the right on both sides of the chair so there is a slight increase in distance.
Try to follow the same path that the line was already on so there isn’t an additional curve added to the end of the chair.

Create the surface of the chair
Now that you have increased the length of the centre line, when you use the “loft” command, there will be a curve on either side of the chair which will look a lot better than having a flat edge.
Be sure to use the right amount of rebuild control points and use a normal style of lofting by following the below settings.

Offset the surface of the chair
In this tep, delete the lines that you have created in the previous steps so you are just left with the surface and then select the surface by clicking or pressing “Ctrl + A” and use the command “OffsetSrf”.

This will give you some settings to again play around with. The main thing is pressing the FlipAll button until the arrow is pointing down rather than up on your Rhino canvas and also experimenting with the Distance you want to offset the surface by.

Create one leg
When it comes To creating the legs of the chair, if you wanted to you could get creative and come up with a different type of design to the design listed below.
However, this is probably the simplest way you can create chair legs so start with positioning your Rhino canvas into the right view and drawing a line that looks as if it would be proportionate to a leg.
You may have to hold down alt to prevent snapping and Shift to be able to get the right angle without it defaulting to 90 degrees.

Mirror the leg
In the same view, use the “Mirror” command which will enable you to create a leg on the opposite side of the chair at the same angle.

Complete the leg
Next, create a line that joins the two lines you have previously created in the below steps and then use the “fillet” command.
This will prompt you to select the first curve you want to fillet and then the second curve and you can add in both curves individually

Pipe the chair legs
Next, you want to select the line you have filleted and joined in the previous step and run the “pipe” command. Then, type in a diameter for the start of the pipe and the end of the pipe that makes sense to represent the width of the chair leg.

In this example, we typed in 0.4 and 0.4 for both sides. (You would want to have the same number for both sides of the pipe unless you want one side of the leg wider than the other)

Duplicate the chair legs
In this final step, use the Front and Top views to position the chair legs so they are touching the chair and they are equally spaced apart and the same distance from either side of the chair.
Using the “Move” commands and making sure OSnaps are turned on will help you out during this process.
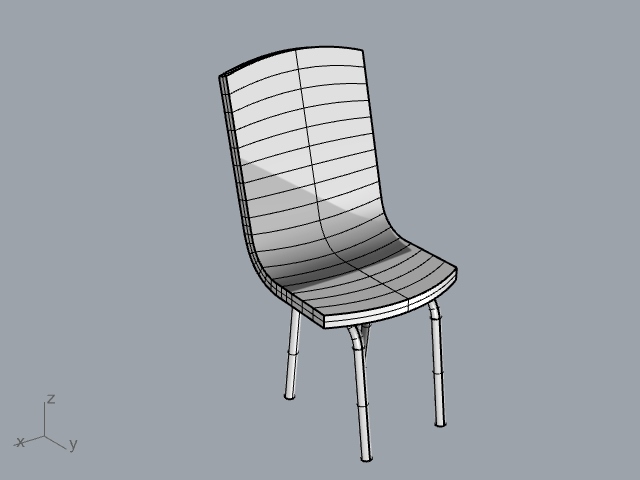
This will give you a realistic looking chair that looks ergonomic and suitable for someone to sit on. A perfect addition to the furniture you’re creating in Rhino that may be forming the start of an interesting and well designed interior space!

Now you have your chair design, you can copy and paste the design as many times as needed and perhaps arrange them where necessary.
What different types of chairs can you create?
In this example, we have created more of a dining chair and perhaps a chair that could be used outdoors if you changed the material in the right way.
Now, before or after you go through the above steps. It may be useful to take a note of the different chairs that could be designed. Below, for inspiration, you can check out what kind of chairs that are available to model in Rhino as some would suit your space better than others.
It could be that you find a bench is more suitable for the space you’re modeling in Rhino due to it being outdoors or even that a desk chair better suits the model as the users of the building will be sitting at office desks.
Office chair
In order to get your chair to appear more like an office chair rather than any other chair. It may be worth beginning to model using a chair with a larger backrest. So, when you get to this step in the tutorial, perhaps take extra care here to represent the chair in the right way.
Office chairs have a larger backrest because they help support someone who sits down at a desk for a long period of time without developing poor posture.
You may also attempt to model wheels into the chair so you show that the office chair is able to be moved around. To begin modeling this, add a sphere to the bottom of the chair to show they are wheels alongside the larger backrest and be sure to take inspiration from images of office chairs as you go to make sure you’re representing it in the right way.
Desk chair
Desk chairs are usually more comfortable than dining room chairs or normal benches so if you want to model this, use some extra padding in the process. You may want to follow our tutorial on how to create a sofa so you can add these cushions into the desk chair effectively.
Bench
Benches are any chair that doesn’t have any back support. As a result, they are probably easier to model than any other type of chair. Benches are perfect as an addition to outdoor furniture. They also can still be modeled with a lot of detail despite their simple shape.
Using parametric design or even any type of design that uses curves and different types of materials are all ways to make your bench design stand out and also perhaps suit an interior environment too that can fit nicely next to you indoor chairs, curtains and tables in an indoor space.