There are a few ways to move your objects in Rhino to the origin. We’ve laid out a guide so you can quickly change the position of your model to the origin without any complicated explanations.
To put it simply, do the “move” command > select objects > choose a point > Then type “w0,0,0”
Nonetheless, read on for a more in depth guide if any of that doesn’t make sense or you would like alternatives.
The chance are that at some point in your journey learning Rhino, whether that be to create a 3D origami structure or finding any cool object to make in Rhino, you will need to move the object to the origin so it may be worth reading all the methods we have provided.
contents
Using the Move command to move objects to the origin step by step
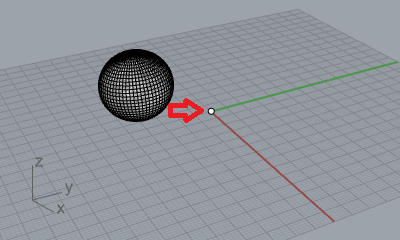
The “move” command is our favorite way to move an object to the origin because you can use it any view and it is nice and quick. In this example, we will be moving this spherical shape into the origin to demonstrate.

Step 1: Use the move command
Simply type “move” into the command line which will prompt you to select the objects you want to move.

Step 2: Select the object
Select the object you want to move. No matter how small or large your model is, it does not matter. Just make sure you don’t select other parts of your model you don’t want to select.
Hold down “shift + click” to select a lot of objects at a time or hold down “ctrl + click” to deselect those objects accordingly
Once finished, press “enter” on your keyboard

Step 3: Click on the point you want to snap to
Click on a point on your model that you want to snap to the origin. If you want the base of your model to be at 0 then select a point on the base.
You can use the Gumball point features to select a point. You can turn them on by going to the base of your Rhino canvas and selecting “Gumball”. The tab will appear darker once selected.
Then, tick the boxes of the points you want your mouse to snap to for your preference. The more boxes you tick the more options you will have but checking some basic ones like “near” and “point” are essential.

Step 4: Type in the right coordinates into the command line
Now you have chosen your point, type in “W0,0,0” in the command line.

This will snap your object the origin. The first 0 refers to the X axis (width), the second zero refers to the Y axis (depth) and the third refers to the Z axis (height)

Use the Edit python code command
Another quick and easy way to move your objects to the origin is to use python script. This method is perfect for if you need to keep moving the objects to the origin and don’t want to keep repeating the move command as it is slightly quicker to execute.
In this example, the code is written below.
Step 1: Open up the python editor in Rhino by typing in the “EditPythonScript” command

Step 2: Copy and paste the code below into the python editor like so:
def MoveObjsBBCtrToW0():
objs=rs.GetObjects("Select objects to center at world 0",preselect=True)
if not objs: return
rs.EnableRedraw(False)
origin=rs.coerce3dpoint([0,0,0])
for obj in objs:
bb=rs.BoundingBox(obj)
if bb:
ctr=(bb[0]+bb[6])/2
rs.MoveObject(obj,origin-ctr)
MoveObjsBBCtrToW0()
Step 3: Press the green debugging tool which will run the script. From here you can select the objects you want to align and press “enter”

Top tips and common mistakes when moving objects to the origin in Rhino
Some issues may arise if the above methods do not work straight away. Here are some potential problems you may run in to when moving your objects to the origin alongside some tips to make things easier too.
Not using osnap to select a point in rhino
If you don’t turn on osnap in Rhino when selecting a point you will move to the origin, then it can become hard to select a point. Make sure the points you want your mouse to snap to are selected with a blue tick in order to accurately snap to the right points on an object.

Turning on the grid feature
Turning on the grid can help you to visualise where the origin is in the first place which may help with manoeuvring your model and orienting it to your liking
Not using a bounding box
Bounding boxes allow you to position the exact centre of your model to 0,0 rather than a point you can find using the osnap command. This will be especially hard if you have a more complicated model.
Simply type the command “BoundingBox” and select all the parts of your model you want to move to the origin.

Because your model is now in a box, it is easy to use the osnap command to find the centre of the model and move that centre to the origin.
Roughly picking where the centre of a complex shape is is an accurate way to move the centre of a model to the origin.

How to move to z 0 in rhino
Sometimes, when you use other commands to move objects to the origin like “SetPt” or “CPlane” you can end up flattening the points in your model.
To avoid this, use the align command but in the front view. It is important you move to the front view as it is hard to move an object straight down in perspective view without moving it in the X and Y axis as well.
Why should you move your Rhino model to the origin?
Moving your model to the origin can be great for simplifying your workflow. For example, using certain commands like “Make2D” to draw extra lines on your Rhino canvas always export the lines near the origin.
Therefore, if your model is far away from the origin it can become troublesome panning in and scrolling back and forth between your model and where the “Make2D” command draws lines. For more tips like this on how to simplify your workflow, sign up to the Architecture Genie website for some quick tips.
As well as this, many plugins for Rhino use the origin as a reference for real life. Especially if you are using your model alongside plugins that connect to technology like 3D printers, CNC machines or real world equipment.
In addition, some plugins such as grasshopper and the plugins that attach to those use the origin and directions to work. For example, the X axis often corresponds to North and South in an architectural model and refers to lines of latitude and longitude.
It is essential you are accurate to the origin in these cases to allow the software to work and the data your draw from it to be accurate.
However, if it is too much hassle to move your model to the origin or you don’t for whatever reason, unless you encounter a problem like listed above, there is no real benefit to it.